This guide will walk you through creating patient groups and sending mass emails in Avaros. Whether you need to reach out to patients about preventive care or send appointment reminders, we've got you covered.
In this article, we’ll cover the following:
- Getting Started
- Creating Patient Groups: Two Methods
- Managing Your Search Results
- Understanding the RE-RUN Function
- Sending Broadcast Emails to Your Patient Group
Getting Started
First, let's navigate to the right place:
- Go to Dashboards at the top of your schedule
- Click Patient Search (you'll find this as the second button on the left side)
Creating Patient Groups: Two Methods
There are two ways to create patient groups in Avaros, and each has its own benefits. Let's explore both so you can choose what works best for your needs.
Method 1: Build a Custom Search
This method gives you the most flexibility. Use it when you need to combine specific criteria to find exactly the patients you're looking for.
- In Patient Search, click + Add rule to add each criteria you want to include
- Select your criteria from the drop-down menus - you can search by age, medications, provider, and much more
- Keep adding rules to make your search as specific as you need it to be
- When you're happy with your criteria, click Search to generate your patient group
- Review the results at the bottom of the screen if you are happy with your review click here to move forward to the next step.
💡 Real example: Let's say you want to find all patients over 65 who are assigned to Dr. Wyle and are currently on blood pressure medication. You would add three rules - one for age 65 and older, one for Dr. Wyle as the assigned provider, and one for the specific medication you're looking for.💡
Advanced Feature: Using Groups for Complex Logic
Sometimes you need more sophisticated search logic than simple "and" conditions. The + Add group button allows you to create nested groups of criteria with their own logic operators. This is perfect when you need to search for patients who meet complex combinations of conditions.
How to Create a Group:
- Click + Add group (located next to the "+ Add rule" button at the top right)
- A new grouped section will appear with Not, And, and Or toggle buttons at the top
- Choose your logic operator:
- And - All criteria within the group must be met
- Or - Any one of the criteria within the group can be met
- Not - Excludes patients who meet the criteria in the group
- Add rules inside the group just like you would normally - each rule within the group will be connected by the logic operator you selected
- You can add multiple groups and nest them to create very specific search queries
- When you're happy with your criteria, click Search to generate your patient group
- Review the results at the bottom of the screen if you are happy with your review click here to move forward to the next step.
💡 Real example: Imagine you want to find female patients between ages 15-45 who are on a particular brand of birth control, but you want to exclude anyone with a specific patient label. You would:
- Add a rule at the top level for "Patient Label" with the label you want to exclude
- Click + Add group
- Select And as your logic operator (so all conditions in the group must be true)
- Inside the group, add three rules:
- Medication Name Contains "Alesse"
- Age Between 15 and 45
- Sex Is Female
- Click Search
This creates a search that finds patients matching all three grouped conditions while respecting your top-level exclusion criteria.
Method 2: Use a Search Template
Search templates are pre-built searches for common tasks like tracking preventions. They're great time-savers when you need quick results for routine outreach.
- Click on the search templates option in Patient Search

- Choose the template that matches what you need:
- Appointment Booking Report - See appointments booked by provider, date range, and booking method
- Preventions Complete Report - Find patients who have already received a specific prevention
- Prevention Not Completed Report - Find patients who still need a specific prevention (perfect for outreach campaigns) Currently includes prevention types: Mammogram, PAP, Colorectal Screening & HPV Screening.
- Select the specific prevention or report criteria you're interested in
- Choose which provider(s) you want to include in your search
- Set your date range to focus on the time period that matters
- Click Search to see your results
- Review the results at the bottom of the screen if you are happy with your review click here to move forward to the next step
Common Use Case 1: Finding Patients Who Need Colorectal Screening
One of the most common uses for patient groups is identifying patients who need preventive care. Here's how to find everyone who needs a mammogram:
- Within Dashboards, click search templates
- Select Prevention Not Completed Report
- Choose "Colorectal Screening" from the prevention dropdown
- Select the provider you want to search for (or select all providers if you want a clinic-wide list)
- Set your date range - for example, January 1, 2024 to present to find patients who haven't had a Colonoscopy in this time range.
- Click Search
- Review the results at the bottom of the screen if you are happy with your review click here to move forward to the next step
That's it! You now have a complete list of all patients who haven't received a flu shot in that time period, and you're ready to reach out to them with a reminder.
Common Use Case 2: Finding Patients Who Completed Mammograms
Sometimes you need to see who's up to date rather than who's behind. Here's how to find patients who have completed a specific prevention:
- In Patient Search, click search templates
- Select Preventions Complete Report
- Choose "Mammogram" from the prevention dropdown
- Select the provider (or all providers for a complete picture)
- Set your date range - for example, the past 12 months
- Click Search
You now have a list of all patients who completed mammograms in your selected timeframe.
Managing Your Search Results
Once your search is complete, you'll see your patient list at the bottom of the window. Now you have several helpful options:
-
Review and clean up your list:
- Uncheck the box next to any patients you want to remove from the group
- Use the search box at the top to quickly find and locate specific patients by name
-
Export your data for offline review:
- Click the Export button
- Choose either CSV or Excel format depending on your preference
- Open the file in your spreadsheet software to review
-
Save as a reusable patient group:
- Click + Create Patient Group
- Give your group a clear, descriptive name (for example, "2024 Flu Shot Needed" or "Dr. Smith Diabetic Patients")
- Click + Patient Group to save it
- You can find all your saved groups anytime by clicking the Groups icon on the left side of the screen
Understanding the RE-RUN Function
When you click RE-RUN next to any of your saved patient groups, the system automatically refreshes the list based on the most current data in your system. This means it will:
- Add any new patients who now meet your criteria
- Remove patients who no longer qualify based on the criteria
- Keeps any patients you manually unchecked removed when you first created the group
Sending Broadcast Emails to Your Patient Group
Once you have your patient group ready, sending a mass email is straightforward. Here's how:
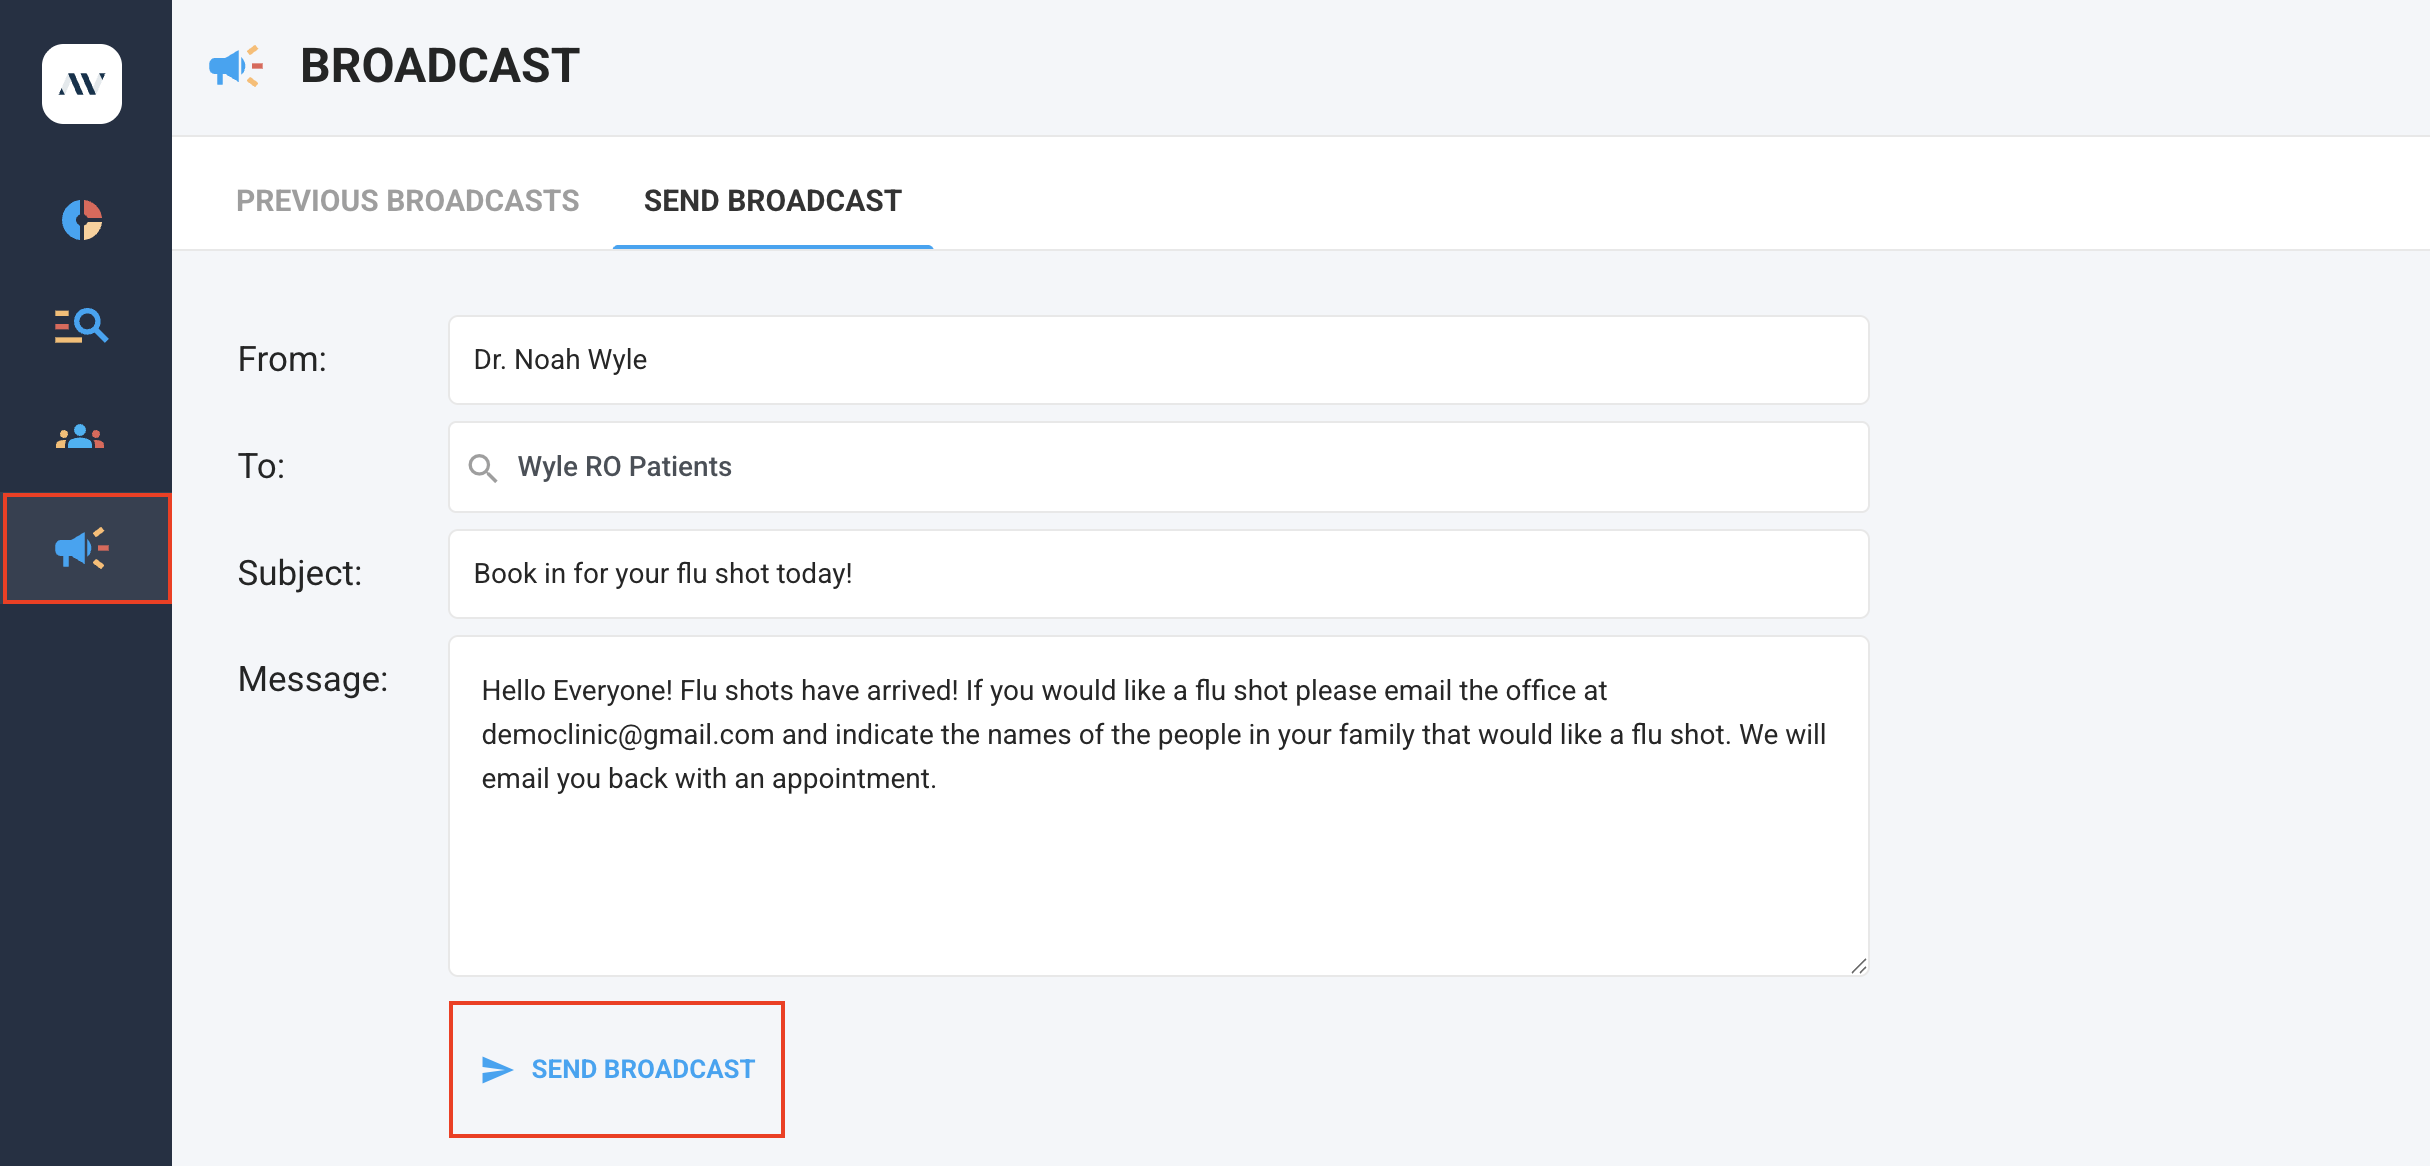
- Click the Broadcast tab on the left side of your screen
- Click Send Broadcast to start composing your message
- Fill in the required fields:
- From: Enter your name or your clinic's name
- To: Select the patient group you just created from the dropdown
- Subject: Write a clear, informative subject line for your email
- Message: Compose your email message in the body field
- When you're ready, click the Send Broadcast button at the bottom
The system will send your message to all patients in your selected group who have an email address on file in their master record.
Important Things to Know
💡 Automatic Patient Exclusions: The system is designed to protect you from accidentally reaching out to inappropriate patients. It automatically excludes patients with the following statuses from all patient groups
- IN (Inactive patients)
- MO (Moved patients)
-
DE (Deceased patients)
Related Articles
Want to learn more about messaging in Avaros? Check out these helpful articles:
Secure Patient Messaging
Messenger
Messaging: A Complete Overview
Sending Broadcast Emails in Avaros
Did we miss something? Not to worry! Just contact our support team here ✌️
Comments
0 comments
Article is closed for comments.